|
      
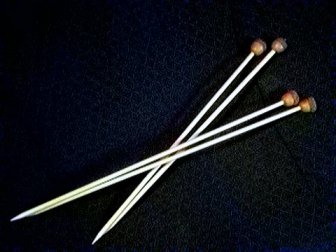
Handmade
Wooden Knitting Needles
 
Making your own
wooden knitting needles is quite simple, and fun! The way I made
them was to basically use wooden dowel rods (from hardware or hobby/craft
stores-hardware stores are usually cheaper), around 1/4" or so,
or whatever size makes the needle size you want. I take my needle
sizer to the store with me to slip over the dowel and check what size needle
it will make, and shoot for about a size 7-8 US for
beginner needles. Then cut the dowels into pieces that are about 10" long, or
whatever length you feel is appropriate for what you
are doing (a heavy duty pair of kitchen
scissors worked for me, or try scoring them first
with a blade and snapping them). Then use a pencil sharpener to make the rough points, and then
take sandpaper to the whole needle. First a rougher grain to do the shaping,
and then a very fine grit one to make them very smooth. I've
also used some wax paper to rub on the whole needle to help smooth it after
sanding, and check for snags. I've also used wood oil, or mineral oil, to
condition the needles, but wax paper does work, too, or even after doing the
oil.
To make the ends, I used the type of clay
that you bake in the oven to harden. Sculpey
was the brand I used. We've made all sorts of colors of ball ends,
from plain to polka dotted, swirls, and even acorns! (See
note below) Then carefully put the clay ball on the flat bottom end of
the needle, and push it on enough so that it will
make a good hole to attach it with, but not so far as to make it come
squishing out of the end. Then, they are ready to put in the oven, and
bake according to the clay maker's instructions (usually about 30 minutes),
having the clay ends hanging off the edge of a baking pan
or rack, so they don't flatten out while hardening. After taking them
out and letting them cool down, carefully pull the
clay balls off of the needle, and put a dab of good glue (I usually use
Aileen's Tacky Craft Glue) in the ball, and put the needle back in, and let
dry, preferably overnight.
Then, they are done and ready to go! They
are pretty cheap, and you can get quite a few sets out of a few dowel rods,
and the clay makes lots of ball ends, if you don't make them too huge!
In fact, don't make them too large, or you'll have heavy
needles wearing out your knitting fingers!
Acorn Needles
Notes: My favorite needle design to make is
the acorn topped
ones pictured above. Fall is a great time of
year to make them, with the nuts all over the ground
waiting to be collected. I made them by
getting the gold colored clay and using that to shape a ball the size of the
actual acorn nut, and using the "real thing" for the outer top. I pulled the
nut part out of the top case part of acorns, and then put the clay nut into
the acorn top, and inserted the needle gently and shaped the clay to be smooth
around the needle and into the top of the acorn. I must say they look so real
that people have done a double-take when they see them!
And a few more hints: Bake the needles complete,
with the acorn tops attached. Then after they
cool and you remove the clay ends to glue
them to the needles, also see if you can pop the acorn tops off and put
some glue on them and re-secure them to the
clay. While the tops might stay on all by
themselves at first, they'll probably pop off at some point, so
it's best to stick them on securely right from the
start.
The real trick to doing the acorn ones is to get the clay nuts to be
just the right size for
the tops. It took several tries when I first made the
clay balls to get them to fit the tops after I put the needles in
them. At first I was making them too large, and
when I put the needle in them it would squish the
clay out of the edges of the top, and I had big blobs
instead of acorns! But after I got the hang of making the right size
nuts, the rest was easy.
And most important, have fun
and make some to share, especially with kids, while you spread the art of
knitting with others!
|